Tuesday, June 25, 2013

Recipe - Egg Cups with Ham and Bacon

Gotta give credit to where credit's due. Once again, the inspiration came from a casual conversation at work. Our senior associate was heating up these little egg bites and I couldn't help but ask. She then told me about this phenomenon called... egg cups?! For people who want to stay healthy/get rid of old food in their fridge, this was a marvelous idea! Two seconds later, I was back at my desk researching a new recipe. I couldn't settle on one recipe I really liked so I just decided to do them all and let's see how it turned out...

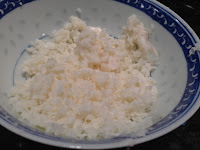
Sweet peppers, we had only three in our fridge and the boyfriend helped diced all of those. We also took our mozzarella cheese, using our grater, shredded as much cheese as we thought we wanted to consume. I'd suggest about four tablespoonfuls and more if needed. 

Next, mushrooms! Using any types of mushrooms (we prefer portbello), dice those up as finely as you can as well. Note for the bacon - you can do this as your last step of preparing, depending on what you want to do with it. If you're putting the bacon bites into the egg cup, you can go ahead and fry it first and then use a paper towel and absorb the oil - then dice. If you are aiming for a bacon slice to be the base of the egg cup, be sure to put it in your muffin pan after you absorbed the oil so the circular shape sticks.

Next, use a vegetable of your choice (we used kale here), you're free to use spinach if you'd like. Dice it up really fine, a dab of olive oil and stir fry it in a pan with your mushrooms as well.


Add that all together after the veggies are sauteed! A pinch of garlic salt and fresh grounded pepper to taste, you can always add more later if it's not salty enough.

On to assembling the base of your egg cups, using deli ham (I know, this is so neat!), create a little pocket at the bottom of the pan and it'll naturally fold itself over to create this awesome little cup. For the bacon, as mentioned before, go ahead and put it as a circle around each of the individual muffin holders. Don't worry, eventually it'll stick in place and will look awesome for your egg cups!


These are my variations using the different ingredients I had and the ones we decided to experiment with. We have several kinds ranging from:
1) Ham, peppers, chicken
2) Ham, peppers, mushrooms, bacon
3) Bacon, mushrooms, chicken 
4) Hot dog, mushrooms, mozzarella cheese, kale
5) Bacon, mushrooms, mozzarella cheese, kale, ham

So as you can see, you can tailor and adjust what you'd like according to your taste and your preferences for what veggies/meat. All of them came out great though!

Pre-heat your oven to 390, crank them in for 10-12 minutes, you can check if it's good using a toothpick. If the toothpick you stick in the middle comes out clean, it's done. Also, since most people do not have two muffin pans, you'd need to time it right to have one batch finished and to prepping for the next batch.

These were the first ones I created with bacon and ham as the base. Add some fresh ground pepper on top to season. They came out so good!

Baconnnn, these bad boys were the boyfriend's favorite. 

For me, I really enjoyed these because I was able to put them in the fridge and heat them up in the microwave for 30 seconds as a quick breakfast/afternoon snack.

DELICIOUS :) Have fun, they're the perfect breakfast treat or a potluck favor! I am really glad I made them and hope you'll enjoy these delicious egg cups as well.

Prep time: 30 minutes
Cook time: 10-12 minutes each per batch
Overall: 1 hour


Friday, June 21, 2013

Recipe - Spam Musubi

I think I've had spam musubi (pronounced moo-soo-bee) twice in life. Each time I had it, I had really enjoyed it. Needless to say, I figured instead of paying 1.50 each for this delectable Hawaiian treat, I can start making my own so I can decide what ingredients goes into marinating the spam and how much rice for health reasons. So started this little experiment...

I had mostly every ingredient I needed in my pantry minus the sushi vinegar and the sushi seaweed (which you can probably get at your local Japanese/Asian market.) All you really need is rice, seaweed, musubi maker, spam, sushi vinegar, soy sauce, oyster sauce and fukikake which is the seaweed seasoning you see on the far right (optional).

For the rice, you can make your regular rice in a pot or over the stove. Then take out and let it cool for 10-15 minutes, you can do longer if you really want to. But then for about 2 cups of rice, I used a half cup of the sushi vinegar (but you can adjust to taste), 2.5 tablespoons of sugar and a pinch of salt if you'd like. Mix it in thoroughly with the rice but be gently and use a wooden spoon if possible to ensure that the rice doesn't break in the process.

Take the spam out and cut it to your desired thickness, I'd suggest a quarter-half an inch. I didn't want the spam to completely overpower the treat so I made it thinner. Also the thinner, the less spam you eat per bite!

Then onto the egg making process. I scrambled five eggs and cooked it in a small pot, added layers as it was cooking (just three times) and then pressing down with a spatula to achieve the compressed omelette look/making it easier for me to cut later. 

Then to cook the spam. Drizzle a little oil in the pan, over medium heat. I cooked each side for about 2-2.5 minutes. Make sure that it doesn't burn while you're preparing for this. Also, this should be the last component before you start assembling your musubi because you want your spam to be hot as you're putting it altogether! 

With the musubi maker that I purchased from Daiso (best 1.50 I've spent there), you start assembling! First is to put the container to the furthest point of the seaweed. Then you add rice to cover approximately 1/3 of the container.

After your spam is cooked/browned, you carefully (because it's hot!) place them in. Then, go ahead and put the eggs you've previously cooked/cut on top of the spam.

Next, add another layer of rice on top. Using the top of the spam musubi maker, press firmly down to ensure the rectangular shape/stays together for cutting later! 

Slowly keeping the top on the contents, wedge the bottom upwards to ensure the musubi stays in place. 

Look at how pretty it is all packed together! Then slowly wrap it tightly with the seaweed and if it doesn't stick, use a little bit of water and wet the seaweed to ensure it sticks to the rice. Wrap as tightly as possible!

Then, repeat the previous steps until you've used up all your seaweed/spam/egg/rice! This should make around three of these large rolls.

Wowww... it does take a little longer than expected the first time.. But for next time, I'll be more prepared for the process so it'll probably down the preparation time by half an hour or so.

Then using a very sharp knife, slowly cut the big rectangular spam musubis into treat sized little snacks!

It was so deliciously good.. :) 

Don't forget to share with friends and families since now you have more spam musubis than you can eat in one seating. Feel free to put some furikake on top as seasoning as well! 

Afterwards, if you can't finish it all, stick it in the fridge! Next time if you want to eat it, just heat it up for 15-25 seconds to ensure the rice/spam is hot for consumption!

Prep time: 1 hour (maybe longer, depends on your rice)
Cook time: 20-30 minutes
Overall: 1 hour and half - 2 hours

Not bad for a first timer, I'll let you know how fast/slow it takes me the next time around.


Thursday, June 20, 2013

Recipe - Zucchini noodles (Super Healthy/Yummy Pasta Alternative)

It was a just regular day in the office and as I was preparing my oh-so-boring salad for lunch at my desk, I sniffed something so yummy coming from the kitchen that I had to poke my head in and ask what it was! Turns out our senior associate in the office had made zucchini noodles with meatballs and wow, was I blown away. ZUCCHINI? NOODLES? No wayy! I've never even thought of such a concept until she started explaining how she was on a diet and always looking for healthier options than pasta/carbs. I knew right there and then that I HAD to make this dish that night. And as per usual, I didn't want to do it a specific way, I wanted it to do it my way... so I researched and then added some of my own flavors into my Zucchini pasta dish :) Here's how I (with some help) did it!

Purchased three of the biggest zucchinis I could find at Safeway, so cheap! 2 dollars!

Then because I didn't have the actual noodles slicing machine (Amazing noodle making machine), I used a traditional peeler and stood there, hand peeled each zucchini from the bottom up. It did take some time but believe me, it's worth it!

After peeling each, I took our biggest and baddest knife and started cutting it into shreds. Once again, it did take some time but if you do 3-5 pieces at a time, it should reduce the time prepping.

Then I put all of the noodles in a microwavable container, drizzled some extra virgin olive oil on it. Put some garlic salt, parsley flakes, fresh ground pepper, celery salt, a dab of soy sauce and really just whatever herbs you want to season it with on it, mixed it around. Then you NUKE it for 1 minute, see how it is, swirl it around and then nuke it for another 30 seconds - 1 minute (depending on how soft you like your zucchini noodles). I like mine super soft so I did two minutes total.

Look at how pretty it is served in a bowl ready to be eaten... but WAIT.

 Then I decided to garnish it with some pesto shrimp on top! Put it over the stove, add some pesto powder (MY ABSOLUTELY FAVORITE!) mix it all together - you can also get this at your local grocery store. Follow the directions on the packet and prepare the sauce, believe me it's delicious! Add some fresh ground pepper and into the zucchini noodles. Voila! 


And again, just to show how pretty AND delicious it is. One of my new favoritest creations.

Prep time: 30-45 minutes
Cook time: 5 minutes
Overall: An hour or less

I would seriously eat this everyday if I could... and now you can try it!


Tuesday, June 18, 2013

Recipe - Chicken/dried scallops Congee (super easy)

I wasn't going to post this simple recipe until my boyfriend exclaimed last night, "This is the BEST congee I've ever had in my whole life!" Granted he was sick and a little woozy and probably his taste buds were all messed up but I took a quick bite and thought it was delicious as well. I read some recipes online and then kind of just created my own steps along the way.. so hopefully it's useful for those making congee for the important people in your life who might be feeling a little sick!

First off, I decided to use the rice I already had which is this one: http://www.amazon.com/RICE-Sushi-Rice-Japanese-style/dp/B000FJLXHU. Any rice will do really so don't worry about it. Also, we used our rice cooker - I am surprised that my bf didn't know that you could actually use this to cook congee, my mom has done this so many times when I was a kid, I thought it was really common.. but since it isnt normal to do this, I am telling you to use your ricecooker!

I first grabbed some dried scallops from my fridge, rinsed it under water a little and then broke it apart. Place on the side until you're ready to put them in. These are extremely tough so we are going to add these in at the very beginning for them to cook and turn softer throughout the process.

Then, the chicken! I cheated and used our leftover chicken from Costco that we had taken apart the day before - perfectly seasoned and tasted delicious. For those who do not have this, you can just go ahead and rinse the uncooked chicken breast/thigh/whatever you'd like and season it a little with salt and pepper - then just cut into slices and throw them in at the beginning also - this will allow the congee rice to soak up all the chicken flavor as well as the scallops flavor. It's extremely simple.

Then you have to measure the rice, I'd suggest a cup and half for two people and if you want leftovers for the next day, then 2 cups of rice. I had a hard time measuring the amounts of water to put so I experimented. I would say put in 6-8 cups of water per cup of rice for a consistency you see above (I like my congee "thicker") and if you'd like it to be a medium consistency - then 9 -11 cups. For a more watery consistency, I'd suggest even more water. 

Nevertheless, put in a little bit of water, set a timer (like I did) for twenty mins, check on it, set another timer for another 20 mins and check on it again, you can add water as you go so it's def. easier to add less than more.

Little piece of advice - put in a spoon (like the one you see above) into the boiling congee at the beginning. This ensures that the rice doesnt stick to the bottom as it's cooking. It's a nifty Chinese kitchen trick I learned as a kid and I know most restaurants/families do it because it... actually works!


Cook for 45 mins - 1 hour. And Voila! You have "the best congee he's ever eaten"

Prep time: 10 minutes
Cook time: 45 mins - 1 hour
Overall: An hour and half

YUMMY!

Wednesday, June 12, 2013

Recipe - Corned Beef

Corned Beef is honestly one of the easiest things to cook in the world. The only thing you need is time and an appetite for delicious fatty, succulent salty meat. Needless to say, it's a favorite of ours in the household but we can't make it too often because of diets, being healthy, cholesterol yadda yadda..

Anyways, since we can't eat it often... I'll share the simple knowledge and recipe with you!

Corned beef, depending on how many you're feeding... this was a 3.5 pound chunk of meat I got at Costco for 14 or so dollars.

Red, juicy and ready to be cooked - I usually just rinse the meat under water for a good ten seconds because I am paranoid.

A head of cabbage! I suggest getting a smaller one since cabbages (after being cut) do not wilt and become even bigger after soaking in the water. Cut the cabbage however you'd like but keep in mind that you wouldn't want gigantic or little baby leaves you have to pick out later on.

Put the corn beef in the water with the seasoning packet. Then, bring it to a boil and put a lid on it. Afterwards, draw it down to a simmer and then just let it sit. Cook the corned beef for 45 minutes per every pound. So for this one, it was around 2.5 hours! 

I've also added other seasoning such as fresh ground pepper and star aniseed into the mix to give it a little more flavor. Up to you!

20 minutes before you turn off the heat, drop in any veggies you'd like. I usually go with baby carrots and the cabbage we cut earlier. I've heard little red potatoes taste like heaven in here as well!

Final product! Maybe another dab of black ground pepper to top it off and you have one of my favoritest/easiest made dish of all times!

Total prep time: 20 minutes
Total cook time: Varies (45 minutes per pound)
Overall: Around 3-4 hours

Monday, June 10, 2013

Restaurant - Yu Zen

We are always on the search for fresh and affordable (maybe sometimes not even affordable) sushi around town (SF). After some extensive yelp searching + needing to be in Outer Richmond, we came across Yu Zen. This is not your typical sushi joint and looks more like a Chinese restaurant than anything else (owners also changed recently) I wasn't completely sure of the restaurant until the food came so I decided to hold off judgment. Also, the restaurant wasn't super busy but they were running a little slow so they decided to give us a free miso soup and a large bowl edamame in the meantime which calmed my angry butt down. After all the waiting.... fortunately, it was a pleasant surprise. The Chirashi Deluxe was a little pricey but the fish was fresh and the colors/placement of food made this foodie very happy. Also, I had uni with quail egg for the very first time and that made me smile from ear to ear!


 The fried shrimp head was just so beautiful! Everything was fresh and I could probably eat three of these... but I didnt.

Yum yum! Look at how good that looks. Uni with quail egg :) New favorite for sure.

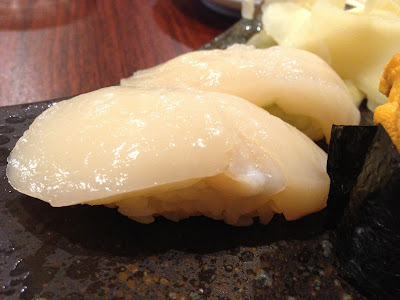
Hotate scallops, it's a little smaller than most places but the taste was no different. Maybe scallops are just not in season... or we are eating them all...

Worth the 15 bucks!

Oh and then we decided to go try the new hip boba tea place in SF. Honey B was relatively good! I really enjoyed my all time favorite - peach green tea (less sugar with no ice) and aloe vera which allows the drinker to put in the fridge and the aloe vera still tasting good afterwards! You don't have the same perks with putting boba in the fridge..

Okay last picture. Pretty, go eat it. The end.

Overall: 4.0/5.0 stars
Presentation: 4.5/5.0 stars
Taste: 4.0/5.0 stars
Decor: 3.5/5.0 stars
Service: 4.0/5.0 stars

Enjoy!