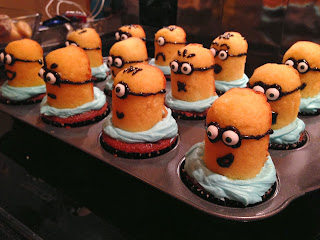
Assemble ingredients! You'll need your choice of cake mix, candied eyes (from arts & crafts store), blue icing, cupcake holders, black icing with pen, and of course, twinkies! Most of the things I was able to get at my local Safeway store.
Do your thing with the cake mix aka follow the instructions on the box.
Bake cake :) easiest step! After the cake is done cooling - make sure you cut off the top part a little to make it flat for placement of the twinkie aka minion's head.
Lay out our twinkies so that you can slice each one into half. Six twinkies for 12 minion heads!
Decorations time - put a bit of icing behind the candied eyes so it sticks - then using the black icing, draw the rims of the minion's goggles as you see above. After you're done drawing the goggles, make the mouth to whatever shape you want. Some ideas are shown above!
Then, spread the blue icing on as much as you want, I used a ziploc bag and cut a hole at the edge and used that as an icing spread. Be careful not to run out of icing though! As you can tell - I also had extra cake batter so I baked an additional cake next to it - you can do the same or just bake more minions!
Stick your final decorated minion twinkies on and make sure they stick! What an easy process!!
Another shot :)
Over the top view! Also, you could buy sprinkles and use them as "hair" but since I didn't want to spend an extra money on brown sprinkles, I opted for the most economical route and just drew some with and without "hair"
HELLO once again from the front!
<3 Enjoy!
Prep time: 20 minutes
Cooking time: 25 minutes
Total time: 45 minutes


No comments:
Post a Comment